VSP2 | What You Need to Know About Setting Up Your Heater Assembly
By Elizabeth Raines, Chemical Engineer, Fauske & Associates
Introduction
Ensuring that the VSP2 heater assembly is setup properly is crucial to performing a successful test. While the heater and heater glands are reusable parts, testing their integrity prior to beginning a test and replacing any questionable parts will help to ensure success. Further, care should be taken to insulate the test cell and heater assembly inside of the containment vessel as well as possible. The heat loss of the assembly during the test will be a determining factor in the overall quality of the test data. This article and video discusses the proper electrical testing and insulating procedures for the heater assembly and provides some setup tips and tricks.
Heat Assembly Background
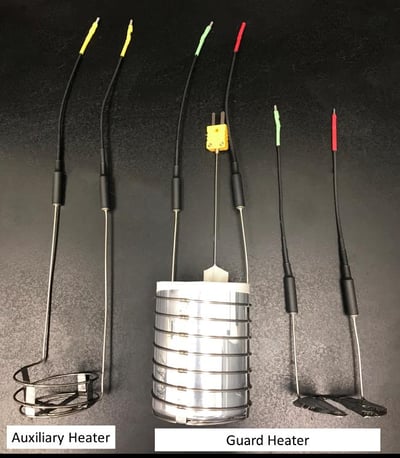
The VSP2 heater assembly is comprised of two separate heaters; the "Main" or "Auxiliary" heater (the "driver" heater used to raise the test cell temperature), and the "Guard" heater (used to maintain the adiabatic environment). The Auxiliary (test cell) heater has approximately three turns of heater wire over the lower quarter and base of the test cell. The nominal resistance of this heater element is 18 ohms. After inserting the test cell in the Auxiliary (Main) heater, a layer of insulation is wrapped around the cell. The Auxiliary heater has wires with male prongs that are shrink wrapped in yellow tape. This insulated cell assembly in turn fits inside the Guard heater assembly. The Guard heater consists of two separate, connected circuits; the larger comprising the bottom and walls, and the top comprising the lid. These are connected using the smaller male and female prongs (these are wrapped with red shrink tape while the Guard heater's other connectors are larger male prongs and the standard assembly uses green shrink tape along these fittings). The nominal resistance of the Guard heater assembly (both elements connected) is 58 ohms. A dual zone “Multizone” Guard heater divides the Guard heater into two zones. The lower zone (controlled by TC2, green tape) comprises the base and lower half of the Guard heater while the top zone (controlled by TC3, and now includes additional blue wrapped male prongs) comprises the upper half. The nominal resistance of the base zone is 29 ohms and of the top zone is 33 ohms. This video and article focuses on the standard heater assembly, but the procedure and principles apply to the Multizone heater assembly as well.

Electrical Checks
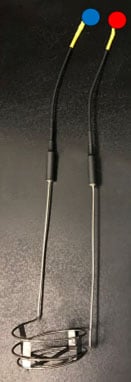
Note, in the following pictures, the locations where the multimeter leads should make contact are identified by blue and red dots, respectively.
Heater
There are four primary checks to be performed to ensure your heater is in good working condition:
A. Verify that the resistance across the Auxiliary heater is approximately 18 ohms
- Turn your multimeter on and set to read resistance (might be shown with the Greek letter omega, Ω, or the word “ohms”)
- Connect each of the leads from the multimeter onto each male prong on the Auxiliary heater:

- The resistance across these two locations should read approximately 18 ohms
B. Verify that the Auxiliary heater is not shorted out and that the resistance is > 10 Mega ohms
- Turn your multimeter on and set to read resistance
- Connect one of the leads from the multimeter to one of the Auxiliary heater male prongs and the other lead to a part of the Auxiliary heater coil:

- The resistance across these two locations should read a very large resistance indicating that the heater is not shorted to the foil (>10 Mega ohms)
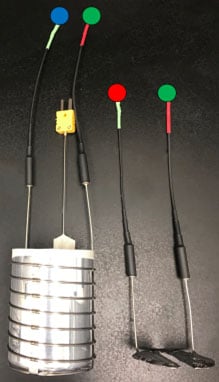
C. Verify that the resistance across the Guard heater is approximately 58 ohms
- Turn your multimeter on and set to read resistance
- Connect the lid heater to the base and lower half heater by connecting the two red smaller female and male prong (the green dots in the photo below)
- Connect each of the leads from the multimeter onto each of the green Guard heater prongs:

D. Verify that the Guard heater is not shorted out and that the resistance is > 10 Mega ohms
- Turn your multimeter on and set to read resistance
- Connect the lid heater to the base and lower half heater by connecting the two red smaller female and male prong
- Connect one of the leads from the multimeter to one of the Guard heater male prongs and the other lead to a part of the Guard heater coil:

- The resistance across these two locations should read a very large resistance indicating that the heater is not shorted out (>10 Mega ohms)
Heater Gland
There are four primary checks to be performed to ensure your heater gland is in good working condition:
A. Verify the heater gland continuity through the vessel
- Turn your multimeter on and set to read continuity (it might look this this symbol , otherwise set to resistance)
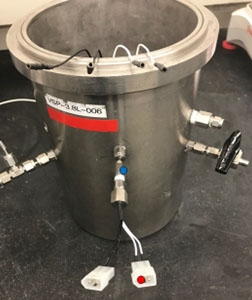
- Connect one of the multimeter leads into one of the female heater gland locations (on the interior of the vessel) and connect the other lead to the male prong on the exterior side of the vessel (touch the metal part on each side):
%20and%20connect%20the%20other%20lead%20to%20the%20male%20prong%20on%20the%20exterior%20side%20of%20the%20vessel%20(touch%20the%20metal%20part%20on%20each%20s.jpg)
- When a complete path is reached, the multimeter will beep (and show a very small resistance of ~0.3-0.5 ohms). Only one pair of male/female parts should be detected as a complete path
- Swap pairs and test that the other wire is intact
- Repeat this procedure on the other set of wires
B. Verify the heater gland wires are not shorted to the vessel and that it is > 10 Mega ohms
- Turn your multimeter on and set to read resistance
- Connect one of the multimeter leads onto one of the male heater gland prongs and connect the other lead to the vessel:

- The resistance across these two locations should read a very large resistance indicating that the heater is not shorted to the vessel
- Repeat this procedure on the other set of wires
C. Plug the Auxiliary and Guard heaters into the heater gland and verify that the resistance across the Auxiliary heater is 18 ohms and the resistance across the Guard Heater is 58 ohms
- Turn your multimeter on and set to read resistance
- Connect each of the leads from the multimeter onto each male prong on the exterior heater gland that is connected to the Auxiliary heater:

- The resistance across these two locations should read approximately 18 ohms
Note, the heater glands consist of two black wires and two white wires. The two Auxiliary heater wires (yellow) should be connected to either two white or two black. The two Guard heater wires (green) should be connected to the other two wires not used for the Auxiliary heater. Then, on the exterior of the vessel, the resistance across the two male prongs should match the resistance of the heater that is connected to it.
- Connect each of the leads from the multimeter onto each male prong on the exterior heater gland that is connected to the Guard heater:

- The resistance across these two locations should read approximately 58 ohms
D. Plug the Auxiliary and Guard heaters into the heater gland and verify that the heater assembly is not shorted out to the vessel and that the resistance is > 10 Mega ohms
- Turn your multimeter on and set to read resistance
- Connect one of the leads from the multimeter onto one of male prongs on the exterior heater gland and connect the other lead to the vessel:

- The resistance across these two locations should read a very large resistance (>10 Mega ohms)
- Repeat with the other prongs
Test Cell Installation
The recommended method of insulating and installing the VSP2 test cell is as follows:
Tip—lay out all the required materials before we begin wrapping the test cell to make the process as quick as possible.
- Place the test cell into the Auxiliary heater.
Note, it is good practice to record the weight of the test cell before (for phi-factor calculations) and after (for measuring mass loss during the test) installing the required fittings. - Wrap the test cell and test cell heater with 2 3/4" wide paper insulation. Use one full-length strip (24") followed by 1/4 of a strip (6"). Use masking tape to hold the insulation in place.
Note, when wrapping the test cell with the paper insulation, it is helpful to tuck the starting end of the insulation strip underneath the vertical leads of the test cell heater. Subsequent wraps are on top of the test cell heater leads. This provides a snugger fit of the test cell in the insulation, minimizing the air gap between the test cell and the insulation. Elimination of the air gap prevents possible convective heat transfer and thereby tends to improve insulation performance particularly at high temperatures and pressures. Normally there is no problem seating the new test cell into the test cell heater, but a twisting motion is necessary for all-welded test cells that have a weld bead on the bottom lip.
Tip—begin by using 3 ~2-3" pieces of masking tape to seal the seams of the paper insulation. Then use 5~6" pieces of tape to wrap the bottom of the test cell. This creates a smoother barrier that makes it easier to slide the test cell into the Guard heater.
Note that the test cell should be insulated from the Guard heater on all sides – along the wall, top, and bottom with the same thickness insulation layer. - Place a 1/2-thickness disk of Fiberfrax insulation (about 1/4" thick) inside the Guard heater can.
Note that the insulation can irritate the respiratory tract or skin if it comes in contact with it so use caution and the proper PPE. - Slide the wrapped test cell down into the Guard heater can.
Tip—mark the thermocouples 1 for the sample thermocouple and 2 for the Guard heater (If using Multizone Multizone heater, mark 3 for the upper zone heater). This makes it clear on the proper connections when the test cell is installed in the containment vessel. - Place a full thickness Fiberfrax disk on top of the test cell. Note, for the thermocouple or if a test cell with a vent is used, the disk on top of the test cell should be cut in half to make room for the different parts.
Tip—it is helpful to have a separate pair of scissors for cutting tape and for cutting the Fiberfrax disks. Cutting the Fiberfrax disks dull the scissors making it difficult to cut tape overtime. - Install the lid heater on top of the test cell assembly, crimping over the top edge of the Guard can if desired to hold the lid heater in a fixed position. A strip or two of white glass-cloth insulation tape can be used to help hold the lid heater securely on top of the assembly.
Tip—it is helpful to align the test cell, Auxiliary heater, and Guard heater assembly so that the heater wires remain close to each other to make it easier to make the required connections. - Place a large Fiberfrax disk on the containment vessel floor. Note, this current video shows the heater gland checks and the test cell insulation. A future video will walk through installing the test cell into the containment vessel and making the required connections.
- Install several large doughnuts (have a whole cut out from the middle for the test cell) of insulation in the vessel to just below where the fill lines connect.
- Slide the Guard heater/test cell assembly down into this nest.
- Connect the fill line(s) and Guard heater ground strap(s).
Note, for the standard heater assembly, this can be accomplished by using a three way ground strap and connecting one of the lines to the fill line, and connecting to each of the red heater wires - Tighten the nuts to the fill line and the pressure line.
Note, if used, support, the 1/16" fill line when bending it to avoid a sharp bend in the tube. Also, ensure that the tube are aligned with the 1/16" or 1/8" bulkhead fitting by first rotating the nut counterclockwise until a click is heard. Then tighten the nut finger tight. Using a wrench tighten the nut an additional 1/8 of a turn. - Continue installing doughnut segments (usually cut in two or three pieces so they can be fitted around obstacles).
- Use small Fiberfrax discs on top of the test cell assembly, cutting them in half or notching as needed to fit around thermocouples and fittings. Insulate up to the upper containment vessel wall penetration. The overall assembly is illustrated below.

Adiabatic calorimeter testing provides data for relief system design, safe scale-up of chemical processes, and changes to process recipes. Safe process design requires knowledge of chemical reaction rates, character and energy release - all of which can be obtained from a low phi-factor adiabatic calorimeter such as the VSP2TM (Vent Sizing Package 2) or ARSSTTM (Advanced Reactive System Screening Tool). If you are interested in purchasing either the VSP2TM or ARSSTTM check out our store by clicking below.

